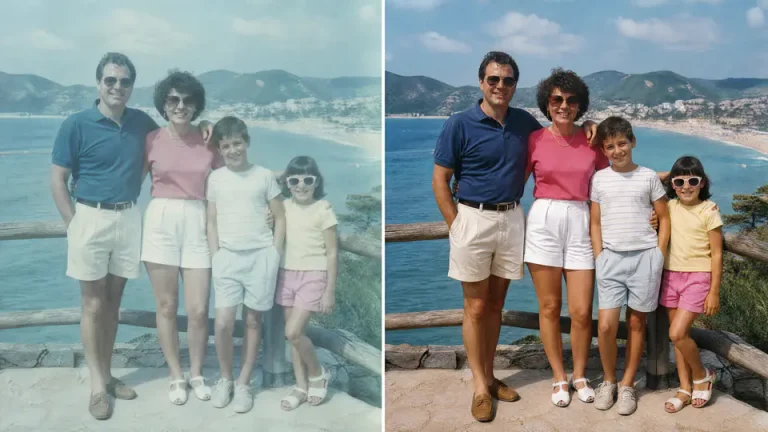
Faded color photos often look flat, yellow, blue, or magenta because the original dyes in the print have weakened over time. The photo may not be torn or scratched, but it can still feel lifeless because the color balance and contrast no longer match the original moment.
For a quick recovery workflow, start with Imgkits photo restoration to restore the old image, then use the AI photo enhancer if the result still needs more sharpness, detail, or contrast.
Signs a Color Photo Has Faded
- Skin tones look too red, gray, yellow, or purple.
- Dark areas look washed out instead of rich.
- White or neutral areas have a color cast.
- The whole image looks low contrast or hazy.
- Details are still present, but the photo lacks depth.
How to Restore a Faded Color Photo
- Create the clearest scan or phone photo you can.
- Open the photo restoration tool.
- Upload the faded color photo.
- Let the tool improve the image and reduce age-related damage.
- Check whether faces, clothing, background, and shadows look natural.
- Use enhancement only if the restored image still needs more clarity.
What to Review Before You Download
Color Cast
Look for unwanted blue, yellow, green, or magenta tones across the entire photo. Neutral areas such as walls, paper, or white clothing make color shifts easier to spot.
Contrast
Faded photos often need stronger blacks and clearer highlights, but too much contrast can crush details. The goal is a natural recovery, not a modern over-edited look.
Faces and Important Details
Always inspect faces, eyes, hands, clothing, and important background details. These areas matter more than making every color perfectly saturated.
Restoration and Enhancement Workflow
| Step | Goal | What to Check |
|---|---|---|
| Restore | Recover old color and reduce visible damage | Color cast, stains, scratches, fading |
| Review | Make sure the result still looks natural | Faces, skin tones, shadows, clothing |
| Enhance | Improve clarity only if needed | Sharpness, detail, noise, over-processing |
| Export | Save a shareable copy while keeping the original | File size, resolution, backup copy |
Common Mistakes With Faded Color Photos
- Over-saturating: old photos should look restored, not artificially colored.
- Ignoring the scan quality: glare and blur make restoration harder.
- Editing the only copy: keep the original scan untouched.
- Sharpening too early: restore first, enhance only after reviewing the result.
FAQ
Can faded color photos be restored online?
Yes. AI photo restoration can improve faded color, contrast, and age-related damage, especially when the source scan is clear.
What if the restored photo still looks soft?
Use an AI photo enhancer after restoration. Enhancement is best as a final clarity step, not a replacement for repairing faded color first.
Should I make the colors stronger than the original?
Usually no. The best restoration keeps colors believable and respects the age of the photo. Natural skin tones and balanced contrast matter more than maximum saturation.
Final Thoughts
Restoring faded color photos is about bringing the image back to a believable state. Start with a clear scan, restore the color and contrast, review important details, and enhance only enough to make the final photo easier to view and share.